Custom installation
Selecting the Custom installation option invokes the Select Features dialog box, which allows you to install specific features, to change the default location of various features, and to check the amount of disk space required by each feature. Use the Custom installation when you are familiar with Crystal Enterprise and know exactly which components you need to install on any particular machine.
In particular, see the Crystal Enterprise Administrator's Guide for information about scaling your deployment across multiple machines.
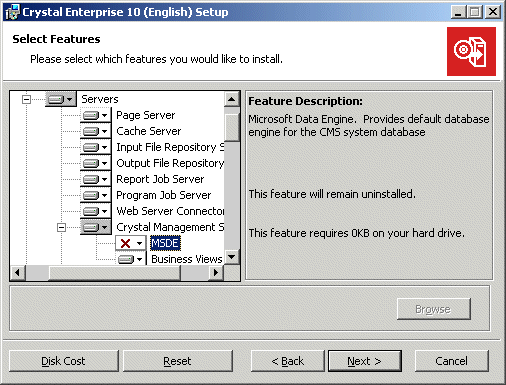
The icons in the feature tree indicate whether the feature and its subfeatures will be installed or not:
- A white icon means that the feature and all its subfeatures will be installed.
- A shaded icon means that the feature and some of its subfeatures will be installed.
- A red X means that the feature or subfeature is either unavailable or will not be installed.
To select the configuration and location of a feature or subfeature, click its icon.
Note: Each feature or subfeature can have its own configuration and location.
Use the following table to determine your installation options for each feature or subfeature:
| Type of feature installation
| Description of what is installed
|
|---|
Will be installed on local hard drive
| - Installs the feature on the hard drive you specified in the Setup program.
- Uses typical installation settings to install some of the feature's subfeatures to the hard drive you specified earlier.
|
Entire feature will be installed on local hard drive
| - Installs the feature and all of its subfeatures on the hard drive you specified earlier.
|
Entire feature will be unavailable
| - Neither the feature nor its subfeatures are installed.
|
Note: Subfeatures are listed below each feature. A subfeature can have a different type of installation than its parent feature.
To install a full standalone Crystal Enterprise without the MSDE
You can use the Custom installation option to install Crystal Enterprise without the Microsoft Data Engine (MSDE). Ensure that the MSDE or SQL Server are not installed on your local machine. Then set up the appropriate database client software or ODBC Data Source Name (DSN). (Consult your local database administrator or your database system documentation for details.)
- Unless Autoplay is enabled for your CD-ROM drive, run setup.exe from the
win32 directory of your product distribution.
When you start the installation, the Microsoft Windows Installer may need to be installed or upgraded on the local machine. If so, the Wise Installation Wizard performs the necessary modifications and prompts you when finished. Click Yes to restart the machine and resume the installation automatically.
- Proceed through the Setup program's dialog boxes and follow the instructions on the screen until you reach the Directory selection dialog box:
You can install Crystal Enterprise on any drive on your machine. Click Next.
Note: To install several Crystal products on the same machine without installing files on the default system drive, first install Crystal Enterprise. When you subsequently install Crystal Reports or Crystal Analysis, those programs will use the common file directory created by Crystal Enterprise.
- When you reach the Installation Type dialog box, click Custom; then click Next.
- In the Select Features dialog box, click the MSDE feature (under Servers > Crystal Management Server) and select Entire feature will be unavailable.
- Click Next.
The CMS Clustering dialog box appears.
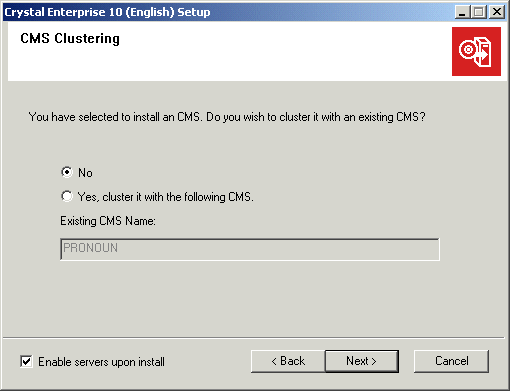
- Unless you want to cluster this new system with an existing system, select No and ensure that Enable servers upon install remains selected.
Tip: For more information on CMS clusters, see the Crystal Enterprise Administrator's Guide.
- Click Next.
The "CMS Database Information" dialog box appears.
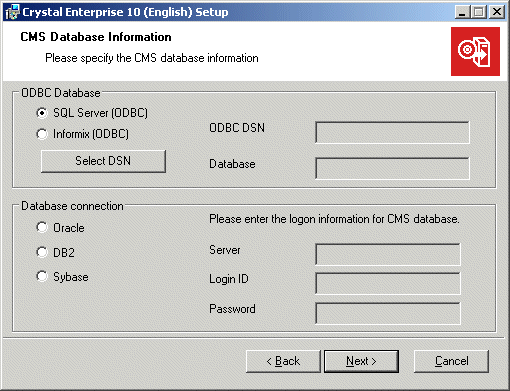
- Specify the database connection type that the CMS must use to connect to the CMS database:
- If you select SQL Server or Informix, click Select DSN to choose (or create) the appropriate system data source and provide the database Login ID and password. Then click Next.
- If you select Oracle, DB2, or Sybase, enter the name of the database server, along with the database Login ID and password. Then click Next.
- When you reach the Start Installation dialog box, click Next.
The installation of files begins immediately. During the installation process, you may be prompted to restart the local machine. When the installation program has finished copying files, you are given the opportunity to register your product.
- When you reach the final setup dialog box, clear Launch Crystal Publishing Wizard unless you want to publish your own reports to Crystal Enterprise immediately.
Tip: Sample reports are installed by default, so you can verify your installation and learn your way around Crystal Enterprise.
- Click Finish.
If the web server installed on the local machine is a supported version of Microsoft IIS, iPlanet Enterprise Server, or Lotus Domino, then the Setup program installs and configures the appropriate Crystal Enterprise Web Connector. Thus, when the installation is complete, you can access Crystal Enterprise by opening your web browser and going to:
http://webserver/crystal/enterprise10/
Here, the term webserver represents the name of the local machine.
Note:
- For CGI web servers, you must perform additional configuration before you can access Crystal Enterprise. For details, see Configuring Web Connectors.
- If you cannot access Crystal Enterprise, start the Crystal Configuration Manager (CCM) from the Crystal Enterprise program group. Ensure that all of the servers listed are both started and enabled.