Scheduling an object with events

When you schedule an object with events, the object will be run only when the additional condition (that is, the event) occurs. You can tell an object to wait for any, or all of the three event types: file-based, custom-based, and schedule-based. If you want a scheduled object to trigger an event, you must choose a schedule-based event.

Note:    A file-based event is triggered upon the existence of a specified file. A custom-based event is triggered manually. A schedule-based event is triggered by another object being run.

When you schedule an object that waits for a specified event, the object will run only when the event is triggered, and only when the rest of the schedule conditions are met. If the event is triggered before the start date of the object, the object will not run. If you have specified an end date for this object, and if the event is not triggered before the end date occurs, the object will not run because not all of the conditions will have been met. Also, if you choose a weekly, monthly, or calendar schedule, the object will have a specified time frame in which it can be processed. The event must be triggered within this specified time for the object to run. For example, if you schedule a weekly report object that runs every Monday, the event must be triggered within the 24-hour period on Monday; if the event is triggered outside of the 24-hour period, then the report will not run.

You can also schedule an object which triggers a schedule-based event upon completion of the object being run. When the object is run, Crystal Enterprise will trigger the specified event. For a schedule-based event, if the event is based on the instance being run successfully, for example, the event won't be triggered if the instance fails. For a sample scenario on when you would use a schedule-based event, see Schedule-based events.

When you schedule an object through the Objects management area, you can specify in the Run list in the Schedule page whether you want to schedule an object with events or not. For detailed information on scheduling objects without events, see Scheduling objects.

To schedule an object with events, first ensure that you have created an event in the Events management area. When you schedule an object, select any Run option which includes the phrase, "with events." For more information on creating events (and sample scenarios for each type of event), see Managing events overview.

To select an event or events to wait for
  1. In the Objects management area of the CMC, select an object by clicking its link.
  2. Click the Schedule tab.

    The Schedule page appears.

  3. From the list on the left of the page, select a recurrence pattern: Once, Daily, Weekly, Monthly, or by Calendar.
  4. In the Run list, select a run option that contains the words, "with events."

  5. Select and complete the schedule parameters for your object (scheduling option, Start Date, End Date, and so on).
  6. In the Available Events area, select from the list of events and click Add.

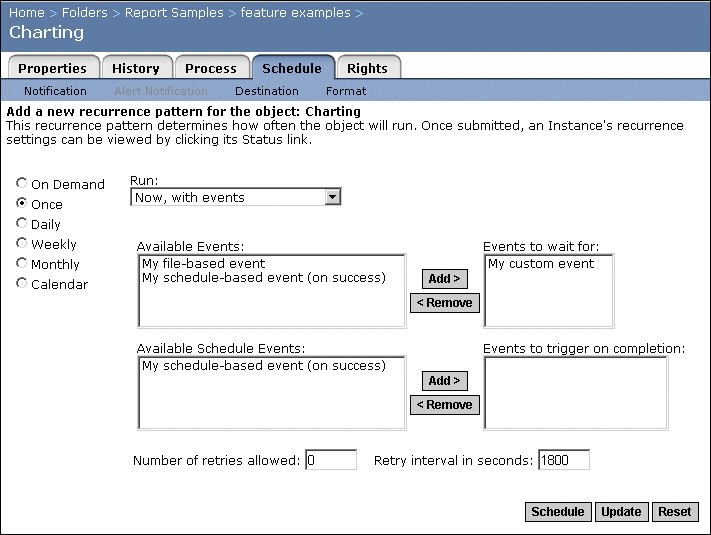
    For example, the report object above is set to wait for a Custom-based event to occur before the report is processed.

  7. To update the default scheduling information, click Update.

    If you don't click Update, any changes you made to the scheduling information are not saved.

  8. Click the Schedule button to schedule the object.
To trigger a schedule-based event or events upon completion
  1. In the Objects management area of the CMC, select an object by clicking its link.
  2. Click the Schedule tab.
  3. From the list on the left of the page, select a recurrence pattern: Once, Daily, Weekly, Monthly, or by Calendar.
  4. In the Run list, select a run option that contains the words, "with events."

  5. Select and complete the schedule parameters for your object (scheduling option, Start Date, End Date, and so on).
  6. In the Available Schedule Events area, select from the list of events and click Add.

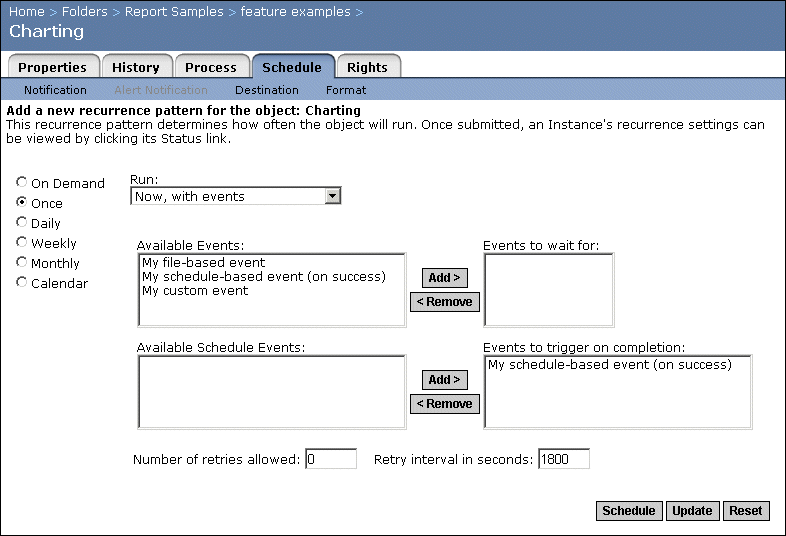
    For example, the report object above is set to trigger a Schedule-based event only if the report is successfully processed.

    Note:    You can only select schedule-based events in this list.

  7. To update the default scheduling information, click Update.

    If you don't click Update, any changes you made to the scheduling information are not saved.

  8. Click the Schedule button to schedule the object.


Crystal Decisions
http://www.crystaldecisions.com/
Support services
http://support.crystaldecisions.com/